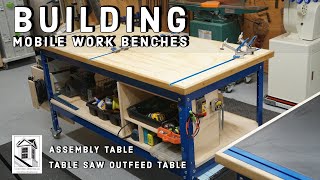
Building Mobile Work Benches | Small Shop Solution
Channel: A Concord Carpenter / ToolBoxBuzz
Category: Howto & Style
Tags: how towork benchremodelworkshopcarpentrywood shoptoolstoolreviewsdiystep by stepassembly tableconstructionoutfield tablekregkreg universal workbenchtable
Description: Small Shop Workbench Solutions | Kreg Universal Work Bench We built two workbenches: Tablesaw Outfeed table and Assembly workbench. aconcordcarpenter.com/kreg-universal-workbench.html For years my table saw outfeed table doubled as my workbench assembly table. The main reason for this is a lack of space, but also my outfeed area sits in the central area of my shop. This setup worked great until it didn’t. It doesn’t work when you are knee-deep into a project on your assembly table and realize that you need to rip something on the table saw, that’s when the trouble starts. The Paulk Workbench Through the years, I’ve gone through many iterations of shop workbench and am always on the look for that unicorn small shop workbench solution. Currently, I’m using the Paulk workbench, which has been great, but not a total solution, for me. Once a heavy project is built on the Paulk bench my table saw becomes useless for anything other than small rips. The Paulk table is the right size for my shop but for it to work well, I’d need to be able to split it in two and put it on casters. That got me looking at the KREG Universal workbench. KREG Universal Workbench The Kreg Universal bench is a system of rails and adjustable height legs that are available in multiple sizes. By combining two different sized legs and five different sized rails, you can create a customized workbench with a lower shelf, or a tool stand, an outfeed table, or an assembly stand. The KREG bench comes in 15 possible sizes from 14" x 14" up 64" x 64" – with two different, adjustable heights. o 31 to 39” height o 17-1/4" to 23-1/4"height The Kreg bench can also accept 3-inch casters, with ½” threads, dual-locking, swivel movement mechanism. Each caster has a load-bearing rating of 150 pounds. The 600lbs capacity appealed to me. 28" x 64" Universal Bench with Standard-Height Legs I locked my sights on the 28” x 64” universal bench and decided that I would build two tables, both on casters. This would allow me several workbench configurations: 1. Bolt or clamp the two together for one large assembly table 2. Split the two, keeping one as the outfeed and the other as a narrower assembly table. 3. Roll one or both around the shop as needed Table Saw Outfeed Table and Tabletop With a 10-inch overhang my 28"-wide by 64" KREG Universal Bench measures 30” x 66”. My table saw is 35-1/4” high which meant I could use the adjustable standard leg kit to achieve my heights with two layers of ¾” plywood for my top. The leg levers have a 6-inch adjustment range. Having both tables at the outfeed height is crucial for me when cutting long material, or sheet stock. In the end my KREG table came to 35 1/8” – acceptable for me. I also added the Kreg Clamp Trak to two sides of the sub-table and then filled in the tabletop with Melamine. This flush mounting keeps the Clamp Trak below the surface of my outfeed top. The Clamp Trak allows me to use the Kreg Bench Clamp of any t-track accessory to clamp materials along two edges of my table. Outfeed Tabletop | Materials Used Some woodworkers expect their workbench top to get messy and don’t care. And they choose cheaper material for the top or plan to change it out regularly. For my outfeed table, I chose to use ¾” black melamine [laminate] for its impact resistance, low maintenance, and the black laminate matches my Delta Unisaw black outfeed table. The melamine comes in a ¾ x 4’ x 8’ sheet and is durable and smooth. As an outfeed table sliding across this sheet is effortless. As an assembly table the surface is smooth and easy to wipe glue off and is wear, scratch, scuff, and mar resistant. I installed this top with screws from the bottom side facing up. The tabletop is a total of 1-1/2”, the top is Melamine with a sublayer of ¾” AC plywood. For the tabletop edges, I overhang the table 1” and attached Poplar wood, edge banding. I used a ¼” round over bit to smooth the Poplar edge banding. For the bottom shelf, I used ¾” AC plywood Assembly Table For the assembly table, I used two layers of ¾” AC plywood. I choose plywood for this table because I want the ability to be able to install screws or other fasteners as needed into, the top. [Melamine would not be a good choice for this.] Additionally, I can sand this top to clean it, or replace it by removing 10-12 countersunk screws. For the tabletop edges, I overhang the table 1” and finished it off with 1-1/2” Poplar wood, edge banding. I used a ¼” round-over bit to smooth the Poplar banding. Note- The Poplar banding was glued and fastened to the bottom layer only. This will facilitate the replacement of the top layer if needed. #workbench #Assemblytable #outfeedtable #kregworkbench